
In the realm of culinary delights, the word “chicken meal” holds a world of possibilities. This comprehensive guide explores the essence of what chicken is all about, explores the various recipes that are made, and offers an array of options to suit every palate.
What Chicken meal Food Is: A Poultry Powerhouse
Poultry is a culinary term that refers to dishes prepared using chicken as the primary protein source. Whether roasted, grilled or fried, chicken’s meal versatility allows it to be the star of countless delicious meals.
Classic Roast Chicken meal: Timeless elegance on your plate
Start your chicken cooking journey with the timeless elegance of classic roast chicken. Learn the art of achieving golden, crispy skin while keeping the meat tender and flavorful. This staple recipe is perfect for family dinners or special occasions.
**Classic Roast Chicken meal : Timeless Elegance on Your Plate**
**Contents:**
– whole chicken (about 4-5 pounds)
– Olive oil
– Salt and pepper
– fresh herbs (rosemary, thyme, or sage)
– Garlic cloves (optional)
– Half of a lemon
Instructions
1. **Preheat the oven:**
– Preheat your oven to 425°F (220°C). Make sure the oven is fully preheated before putting the chicken in.
2. **Prepare the Chicken :**
– Dry the whole chicken using a paper towel. Removing excess moisture helps make the skin crispy.
3. **In and Out of Season:**
– Season the inside cavity of the chicken generously with salt and pepper. For added flavor, fill the cavity with fresh herbs like rosemary, thyme, or sage, optional garlic cloves and lemon halves.
4. **Truss the Chicken (Optional):**
– Trussing the chicken (tying the legs together with kitchen twine) helps the chicken cook more evenly. While optional, it enhances presentation.
5. **rub with olive oil:**
– Coat or brush the entire surface of the chicken with olive oil. This helps in making the skin crispy while frying.
6. **Outer Season:**
– Season the outside of the chicken generously with salt and pepper. Ensure even coating for a balanced taste.
7. **Place in roasting pan:**
– Set the chicken in a roasting pan, preferably with a rack to allow air circulation around the bird. This helps in getting an evenly crispy skin.
8. **Oven Roast:**
– Place the roasting pan in the preheated oven. Roast chicken uncovered for about 20 minutes per pound, an additional 15 minutes. Use a meat thermometer to make sure the internal temperature reaches 165°F (74°C).
9. **Never bust:**
– For extra juiciness, baste the chicken occasionally with the pan juices. Basting helps keep the chicken moist and imparts more flavor.
10. **Check for donation:**
– Use a meat thermometer to check the internal temperature by inserting it into the thickest part of the thigh. The juices should be clear, and the temperature should reach 165 degrees Fahrenheit (74 degrees Celsius).
11. **Relax before carving:**
– Let roast chicken rest for at least 15 minutes before carving. This allows the juices to redistribute, ensuring a juicy and flavorful result.
12. **Carve and Serve:**
– Cut the roast chicken into desired portions. Serve with your favorite sides, such as roasted vegetables, mashed potatoes, or a fresh salad.
13. **Garnish and enjoy:**
– Garnish roast chicken with additional fresh herbs or lemon wedges for a final touch. Enjoy the timeless elegance of classic roast chicken straight from your oven to the table.
This classic roast chicken recipe promises a golden, crispy exterior and tender, flavorful meat—a timeless dish that never fails to impress with its simplicity and sophistication.
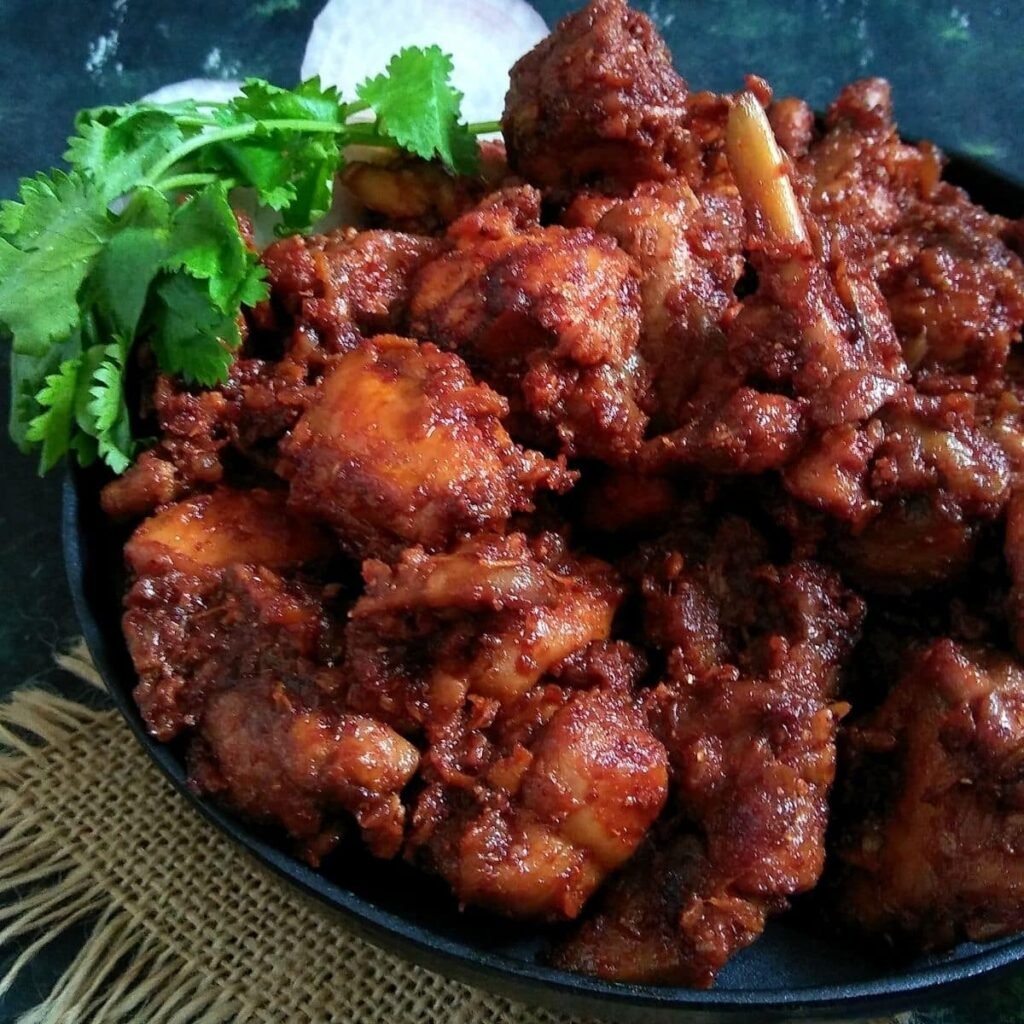
Spicy Buffalo Chicken Wings: A flavor explosion
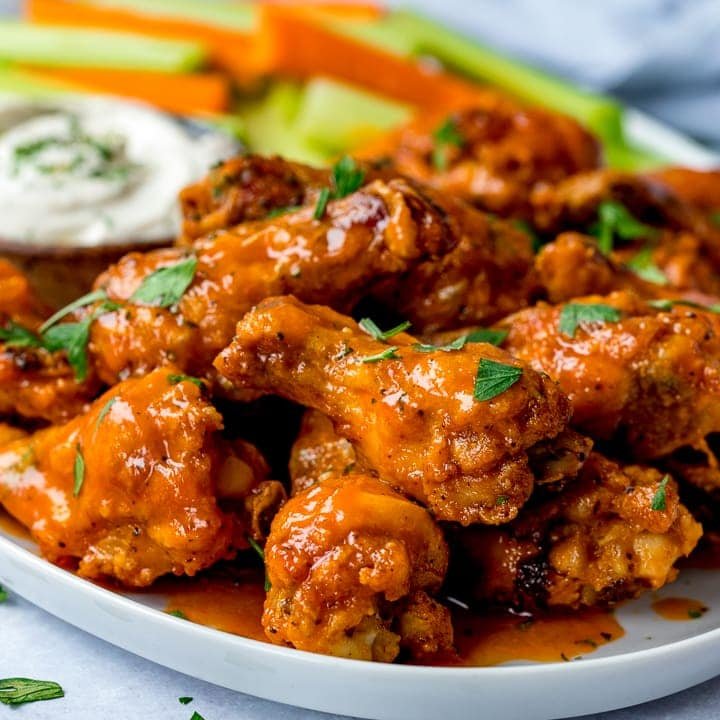
Indulge your taste buds with the bold and zesty flavor of Spicy Buffalo Chicken Wings. Master the art of achieving the perfect crispy exterior and juicy, spicy interior. Ideal for game nights or as a crowd-pleasing appetizer.
**Spicy Buffalo Chicken Wings meal : A Flavor Explosion**
Contents:
– Chicken wings (about 2 pounds)
– Salt and pepper
– 1onecup all purpose flour
– 1(one) cup unsalted butter
– 1cup hot sauce (like Frank’s Redhot)
– 1tespoon of garlic powder
– tspoon onion powder
– 1 tsp red chili (adjust to taste)
– 1tabspoon Worcestershire sauce
– Celery sticks and blue cheese dressing (for serving)
Instructions
1. Preheat the oven:
– Preheat your oven to 400°F (200°C). This initial baking step helps achieve crispy wings.
2. Prepare the Chicken Wings:
– Rinse the chicken wings and pat dry with paper towels. Season with salt and pepper to taste.
3. Coat with flour:
– In a bowl, dredge chicken wings in all-purpose flour until evenly coated. This coating enhances the crispness during baking.
4. Bake Wings:
– Place the dough wings on a baking sheet lined with parchment paper. Bake in the preheated oven for 45-50 minutes, turning halfway through, until golden and crispy.
5. Prepare Buffalo Sauce:
– In a saucepan, melt the salted butter over medium heat. Stir in hot sauce, garlic powder, onion powder, cayenne pepper, and Worcestershire sauce. Mix well and simmer for few minutes.
6. Toss Wings in Buffalo Sauce:
– After the wings are baked, transfer them to a large mixing bowl. Pour the prepared buffalo sauce over the wings and toss until evenly coated.
7. Back to the oven:
– Place the wings back in the oven for an additional 10-15 minutes. This step ensures that the sauce sticks to the wings and caramelizes slightly.
8. **Broil for a crispy finish (optional):**
– For an extra crispy finish, you can broil the wings for 2-3 minutes, watching closely to prevent burning.
9. **slightly cold:**
– Allow the Spicy Buffalo Wings to cool slightly before serving. This helps set the sauce and intensifies the flavor.
10. **Serve with celery and blue cheese dressing:**
– Arrange the buffalo wings on a serving platter. Serve with celery sticks and a side of blue cheese dressing for a classic pairing.
11. **Garnish (optional):**
– Garnish buffalo wings with additional cayenne pepper, green onion, or parsley for a touch of freshness.
12. **Dig:**
– Dive into the flavor explosion of these Spicy Buffalo Chicken Wings. Enjoy the perfect balance of crispy, spicy and delicious goodness.
These Spicy Buffalo Chicken Wings are a crowd-pleaser, combining the crunchiness of perfectly baked wings with the bold and tangy flavors of buffalo sauce. Ideal for game nights or any occasion that calls for a flavor explosion!
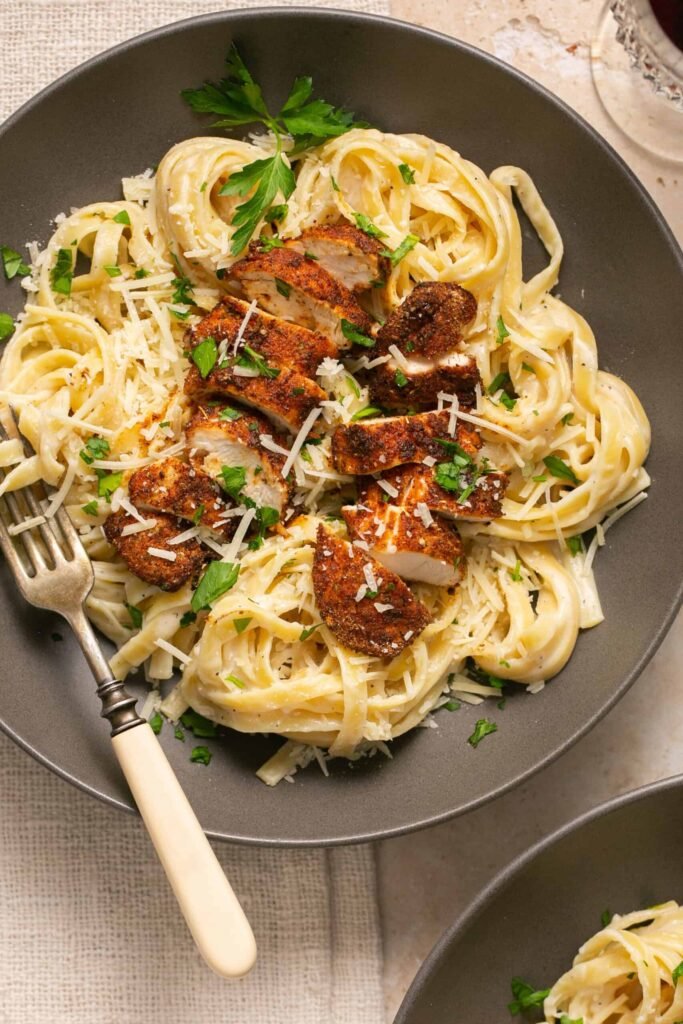
Chicken Alfredo Pasta: Creamy comfort on the plate
Experience the comfort of creamy chicken meal alfredo pasta. Follow the step-by-step process to create a velvety Alfredo sauce that perfectly complements tender chicken pieces. This recipe is a favorite for casual dinners and casual gatherings.
Chicken Alfredo Pasta: Creamy Comfort on a Plate
Contents:
– 8 oz fettuccine pasta
– 2 boneless, skinless chicken breasts
– Salt and pepper to taste
– 2 tablespoons of olive oil
– 4 garlic cloves, minced
– 1 cup heavy cream
– 1 cup grated parmesan cheese
– 1/2 cup unsalted butter
– fresh parsley, chopped (for garnish)
Instructions
1. **Cook the Fettuccine Pasta:**
– Boil fettuccine pasta according to package directions in a large pot of salted water until al dente. Drain and set aside.
2. **Season Chicken Breasts:**
– Season the chicken breasts on both sides with salt and pepper.
3. **Cook the Chicken:**
– In a large skillet, heat the olive oil over medium-high heat. Add the seasoned chicken breasts and cook until golden brown and cooked through, about 6-7 minutes per side. Remove the chicken from the skillet and let it rest for a few minutes before cutting it into thin strips.
4. **Saute the garlic:**
– In the same skillet, add the minced garlic and cook for about 1-2 minutes until fragrant.
5. **Prepare the Alfredo Sauce:**
– Reduce heat to medium-low. Add the unsalted butter to the skillet and let it melt. Pour in the heavy cream, stirring constantly to combine. Slowly whisk in the grated Parmesan cheese until the sauce is smooth and creamy.
6. **Combine the chicken and sauce:**
– Add the chopped chicken back to the skillet, allowing it to heat through the Alfredo sauce. Stir gently to coat the chicken evenly.
7. Toss with Fettuccine:
– Add the cooked fettuccine pasta to the skillet, tossing in the creamy Alfredo sauce until well coated. Make sure the pasta is evenly mixed with the sauce and the chicken.
8. **Adjust Season:**
– Taste and adjust seasoning with salt and pepper if necessary. Parmesan contributes saltiness, so adjust accordingly.
9. **Garnish with Parsley:**
– Sprinkle chopped fresh parsley over chicken alfredo pasta for freshness and added visual appeal.
10. **Serve immediately:**
– Serve Chicken Alfredo Pasta immediately while still hot. Garnish with additional Parmesan cheese and parsley if desired.
11. **Enjoy Creamy Comfort:**
– Indulge in the creamy comfort of Chicken Alfredo Pasta, savoring the combination of perfectly cooked pasta, tender chicken, and a luxuriously creamy Alfredo sauce.
This chicken alfredo pasta recipe brings a touch of elegance and comfort to your plate, making it the perfect choice for a cozy meal or when you’re craving a classic Italian-inspired dish.
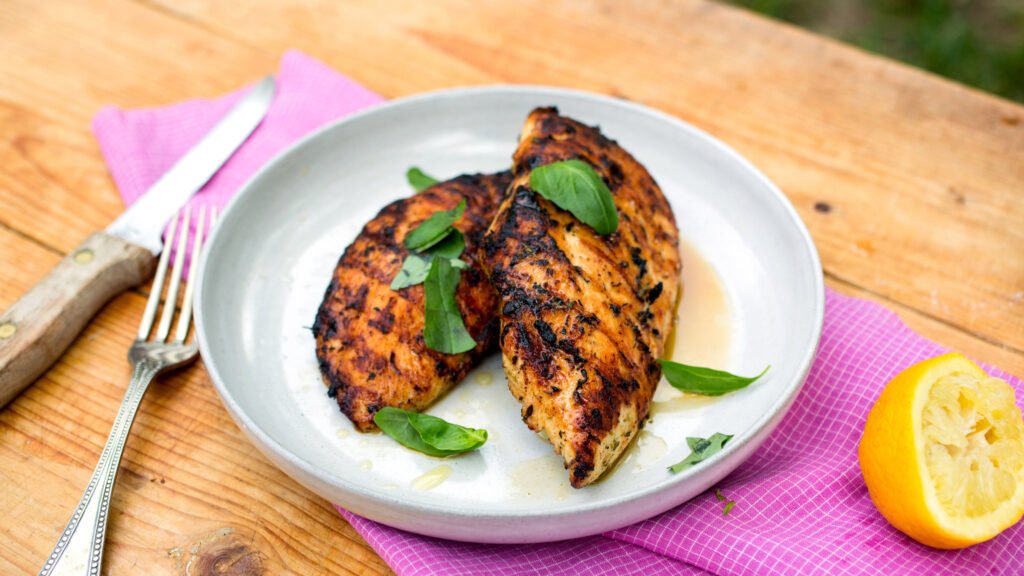
Grilled Lemon Herb Chicken: Fresh and vibrant flavor
Bring a burst of freshness to your table with Grilled Lemon Herb Chicken. Learn the secrets to infusing chicken with zesty lemon and aromatic herbs to create a dish that’s light, flavorful, and perfect for a summer gathering.
**Grilled Lemon Herb Chicken meal : Fresh and Vibrant Flavor**
Contents:
– 4 boneless, skinless chicken breasts
– Salt and black pepper to taste
– 2 tablespoons of olive oil
– 3 cloves of garlic, minced
– Zest of 1 lemon
– Juice of 1 lemon
– 1teaspoon dried thyme
– 1tespoon dried rosemary
– 1 teaspoon of dried oregano
– fresh parsley, chopped (for garnish)
instructions:
1. Preheat the grill:
– Preheat your grill to medium-high heat. Make sure the grates are clean and well oiled to avoid sticking.
2. Season Chicken:
– Pat the chicken breasts dry with a paper towel. Season both sides with salt and black pepper according to your taste preferences.
3. Prepare the herb marinade:
– In a bowl, mix olive oil, minced garlic, lemon zest, lemon juice, dried thyme, dried rosemary and dried oregano. Mix well to create a delicious herb marinade.
4. **Marinated Chicken:**
– Place the chicken breasts in a resealable plastic bag or shallow dish. Pour the herb marinade over the chicken, making sure each breast is well coated. Allow it to marinate for at least 30 minutes so that the flavors infuse.
5. **Grill the Chicken:**
– Remove the chicken from the marinade and place it on the preheated grill. Grill for about 6-8 minutes per side or until internal temperature reaches 165°F (74°C) and chicken is cooked through.
6. **Best with marinade (optional):**
– Optionally, baste the chicken with additional marinade during grilling for extra flavor. Make sure any pickles used for basting are thoroughly cooked.
7. **Check for grill marks:**
– Grill until the chicken develops beautiful grill marks and does not get a slightly charred exterior while remaining juicy on the inside.
8. **Give the chicken a rest:**
– Remove the grilled lemon herb chicken from the grill and let it rest for a few minutes. This allows the juices to redistribute, ensuring a moist and flavorful result.
9. **Garnish with fresh parsley:**
– Sprinkle freshly chopped parsley over grilled chicken for a burst of freshness and added visual appeal.
10. **Serve Hot:**
– Plate the grilled lemon herb chicken and serve it warm with your favorite side dishes such as grilled vegetables, rice or a fresh salad.
11. **Enjoy Fresh and Vibrant Taste:**
– Delight in the fresh and vibrant flavors of Grilled Lemon Herb Chicken, savoring the harmonious blend of zesty lemon, aromatic herbs, and perfectly grilled chicken.
This recipe promises a delightful combination of freshness and herb-infused goodness, making Grilled Lemon Herb Chicken the perfect choice for a light and flavorful meal, especially in hot weather when outdoor grilling is at its best.
Chicken Teriyaki Stir-Fry: An Asian Fusion Delight

Explore the world of Asian flavors with chicken teriyaki stir-fry. Master the balance of sweet and savory teriyaki sauce while creating a colorful medley of vegetables and tender chicken meal. This recipe is a quick and fun addition to your weeknight dinner repertoire.
Chicken Teriyaki Stir-Fry: Asian Fusion Delight
Contents:
– 1 pound boneless, skinless chicken breast, thinly sliced
– 2 tablespoons of vegetable oil
– 1cup broccoli florets
– 1pepper, thinly sliced
– 1carrot, julienne
– 3 cloves of garlic, minced
– 1 teaspoon ginger, grated
– 1/2 cup teriyaki sauce
– 2 tablespoons of soy sauce
– 1 teaspoon of honey
– 1 tablespoon cornstarch (optional, for thickening)
– Sesame seeds and green onions for garnish
– Cooked rice or noodles (for serving)
Instructions
1. **Prepare the Chicken:**
– Cut the chicken breast into thin strips. Season with salt and pepper to taste.
2. **Heat oil in a kava or skillet:**
– Heat vegetable oil in a wok or large skillet over medium-high heat.
3. **Seared Chicken Strips:**
– Add the chopped chicken to the hot wok and stir until golden brown and cooked through. Remove the chicken from the wok and set aside.
4. **Roast Vegetables:**
– In the same bowl, add more oil if needed. Saute broccoli, bell peppers, and julienned carrots until slightly tender but still crisp.
5. **Add garlic and ginger:**
– Add minced garlic and minced ginger to the vegetables. Stir fry for about 1-2 minutes until fragrant.
6. **Prepare the teriyaki sauce:**
– Mix teriyaki sauce, soy sauce and honey in a bowl. Adjust the sweetness and saltiness according to your preference.
7. **Mix the chicken and vegetables:**
– Return the cooked chicken to the wok. Pour the teriyaki sauce over the chicken and vegetables. Toss everything together to coat evenly.
8. **Thick Sauce (Optional):**
– If you like a thicker sauce, mix cornstarch with a little water to make a slurry. Add it to the wok and stir until the sauce thickens.
9. **Check Seasoning:**
– Taste the stir-fry and adjust the seasoning if necessary. You can add more teriyaki sauce, soy sauce, or honey based on your taste preferences.
10. **Garnish and Toast Sesame Seeds:**
– Garnish chicken teriyaki stir-fry with sesame seeds and chopped green onions. It adds a touch of freshness and sweetness.
11. **Serve over rice or noodles:**
– Plate chicken teriyaki stir-fry over cooked rice or noodles, creating a satisfying and complete meal.
12. **Enjoy Asian Fusion Delight:**
– Immerse yourself in the delightful blend of savory and sweet flavors in this chicken teriyaki stir-fry, savoring the perfect balance of tender chicken and crisp, colorful vegetables.
This quick and flavorful chicken teriyaki stir-fry is a go-to recipe for a delicious Asian-inspired chicken meal that you can easily whip up on busy weeknights.
Chicken Shawarma: Middle Eastern Expertise
Transport your taste buds to the Middle East with the exotic flavors of Chicken Shawarma. Discover techniques for marinating and grilling chicken to perfection, creating mouth-watering dishes that are both aromatic and satisfying.
Chicken Parmesan: Crispy and cheesy comfort

Indulge in the crispy and cheesy comfort of Chicken Parmesan. Discover the secrets of breading and baking chicken to get the top crunch with delicious tomato sauce and melted mozzarella. This classic Italian dish is a crowd-pleaser.
Thai Basil Chicken: A Symphony of Thai Flavors
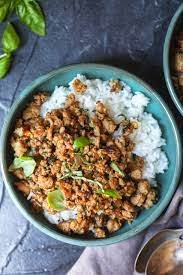
Embark on a flavor journey with Thai Basil Chicken. Learn the art of balancing sweet, spicy and savory elements to create aromatic and rich dishes in the Thai culinary tradition.
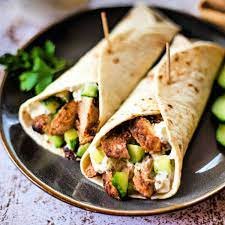
Chicken Tacos with Avocado Lime Crema: Tex-Mex Fusion
Savor Tex-Mex fusion with chicken tacos topped with avocado lime crema. Master the art of seasoning chicken for that perfect taco filling and whip up a refreshing avocado lime crema for a delightful finish.

Chicken Piccata: An elegant and tangy delight
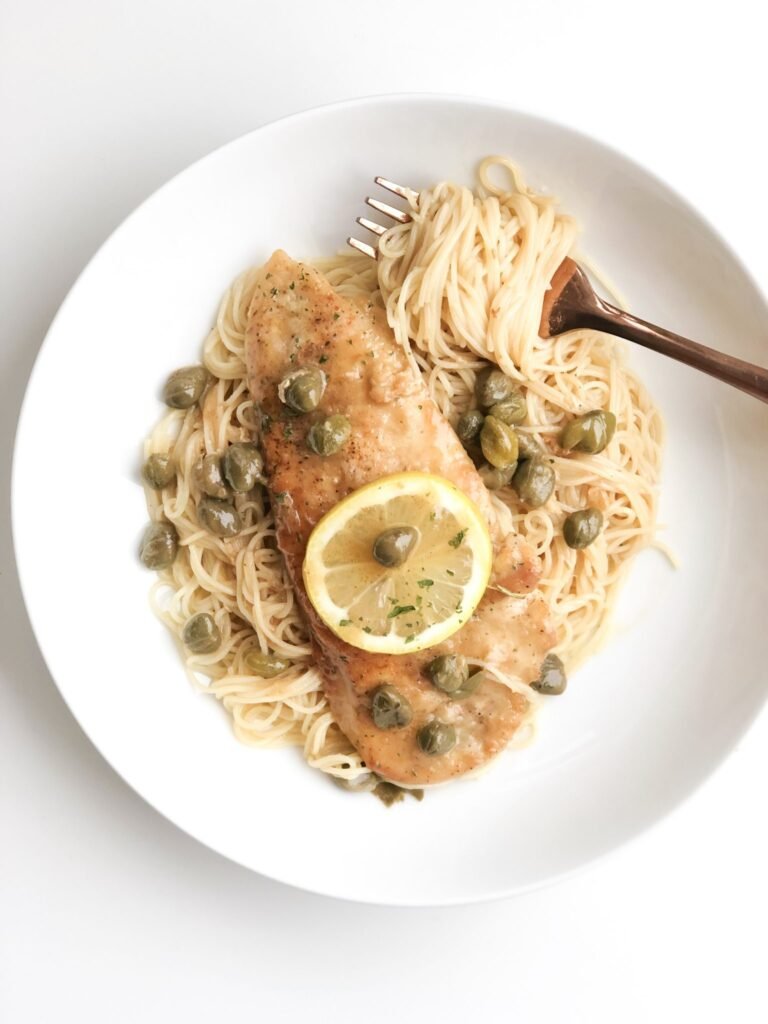
Enhance your dining experience with the elegant and tangy delight of Chicken Piccata. Explore the process of creating a rich lemon and caper sauce that perfectly complements pan-seared chicken breast. This dish is a delightful choice for special occasions.
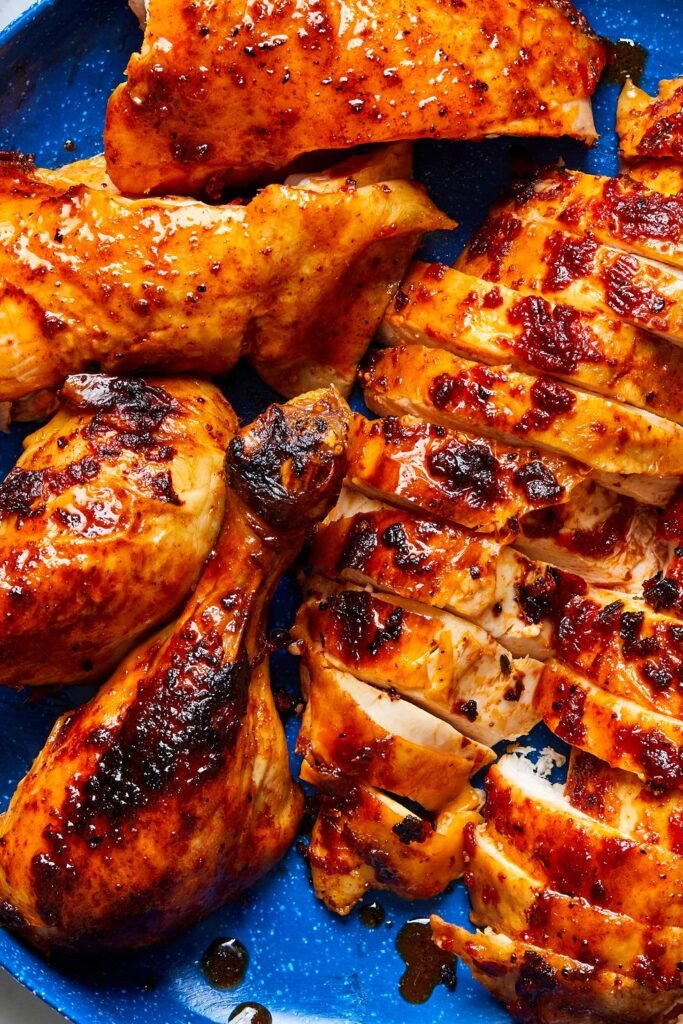
Oven-Baked BBQ Chicken: Finger-licking goodness
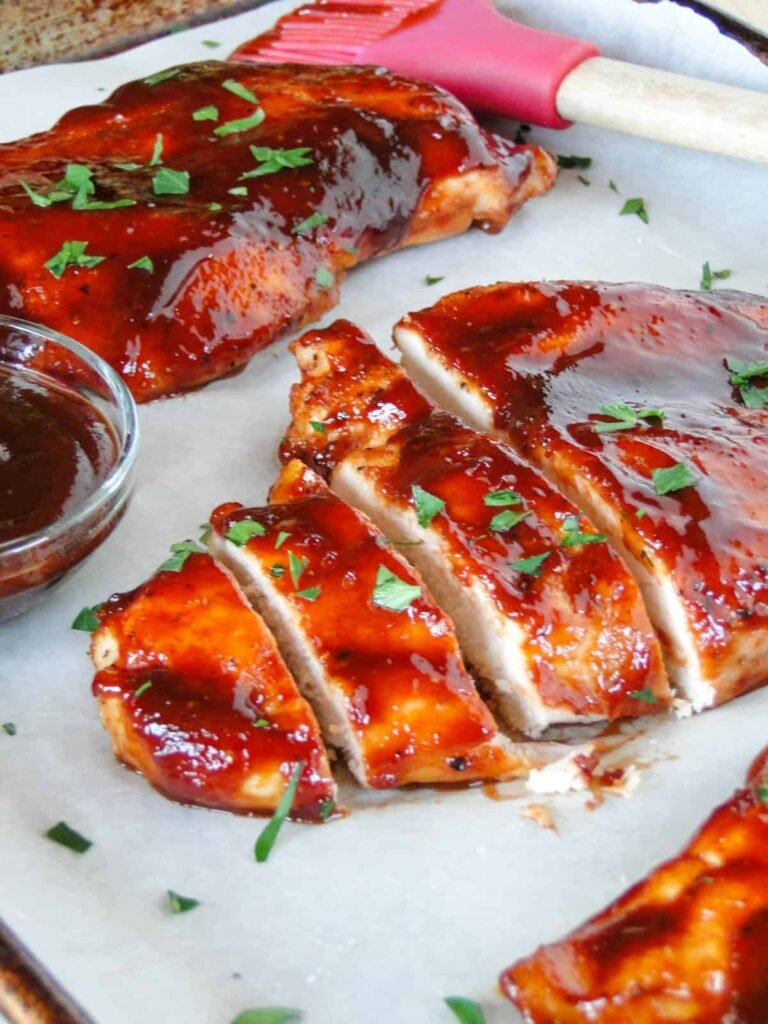
Indulge in the finger-licking goodness of oven-baked BBQ chicken. Unlock the secrets to achieving a caramelized BBQ glaze that makes chicken juicy and flavorful. Perfect for summer barbecues or anytime you want that smoky goodness.
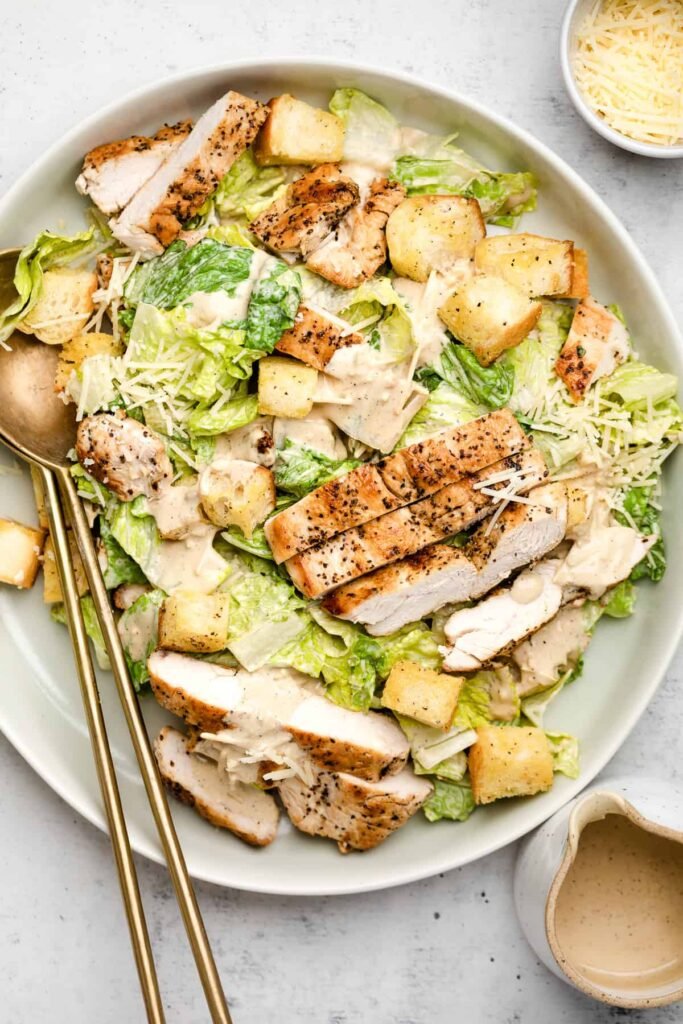
Chicken Caesar Salad: Freshness in every bite
Enjoy freshness in every bite with a classic chicken Caesar salad. Learn the art of assembling crisp romaine lettuce, grilled chicken, and homemade Caesar dressing for a satisfying and healthy meal.
Honey Mustard Glazed Chicken: Sweet and tangy elegance
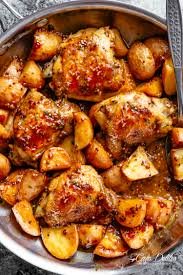
Indulge in the sweet and tangy elegance of Honey Mustard Glazed Chicken. Discover techniques for creating a laissez-faire glaze that transforms a simple chicken into a culinary masterpiece. This dish is a hit for dinner parties and family gatherings.
Creamy Chicken and Mushroom Risotto: Comforting Italian elegance
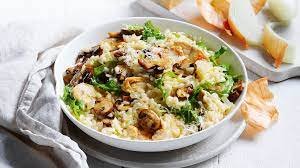
Experience the comforting Italian elegance of creamy chicken meal and mushroom risotto. Discover the secrets to achieving the perfect risotto texture by marrying the earthy flavors of mushrooms with tender chicken. This dish is a testament to the heartiness of Italian cuisine.
Chicken Shawarma: Middle Eastern Mastery
Contents:
– 1.5 pounds boneless, skinless chicken thighs
– 1 large red onion, thinly sliced
– 1/4 cup olive oil
– 3 cloves of garlic, minced
– 1 teaspoon cumin seeds
– 1tsp ground coriander
– one ts of ground paprika
-only1 tspoon of turmeric
– 1one tea poon of cinnamon
– Salt and black pepper to taste
– 2 tablespoons of plain yogurt
– 2 tablespoons of apple cider vinegar
– fresh parsley, chopped (for garnish)
– Pita bread or flatbread (for serving)
– tahini sauce or garlic sauce (for serving)
Instructions
1. **Prepare the Chicken Marinade:**
– In a bowl, combine olive oil, minced garlic, cumin, ground coriander, ground paprika, turmeric, ground cinnamon, salt, black pepper, plain yogurt, and apple cider vinegar. Mix well to create marinade.
2. **Marinate Chicken:**
– Cut the chicken thighs into thin strips. Add the chicken strips to the marinade, making sure each piece is well coated. Marinate for at least 1 hour or ideally overnight in the fridge.
3. **First heat oven or grill:**
– Preheat your oven to 425°F (220°C) or prepare an outdoor grill.
4. **Thread on chicken:**
– Thread the marinated chicken strips onto the skewers. If using wooden skewers, soak them in water for about 30 minutes beforehand to prevent burning.
5. **Mix the chicken and onions:**
– Arrange the skewers on a baking sheet or grill. Scatter thinly sliced red onion around the chicken for added flavor.
6. **Roast or Grill Chicken:**
– Roast the chicken in the preheated oven for 20-25 minutes or grill until the chicken is cooked through and nicely charred.
7. **Rest and Slice:**
– Let the chicken rest for a few minutes after cooking. Remove the chicken from the skewers and cut it into bite-sized pieces.
8. **Hot Pita Roti:**
– If using pita bread or flatbreads, warm them briefly in the oven or grill.
9. **Assemble Shawarma Wraps:**
– Put out warm pita bread or flatbread. Place a generous amount of chopped chicken and fried onions in the center.
10. **Waterfall with Chutney:**
– Pour tahini sauce or garlic sauce over the chicken and onions. These sauces add creaminess and a burst of flavor.
11. **Garnish with fresh parsley:**
– Sprinkle freshly chopped parsley on chicken shawarma wraps for a touch of freshness and vibrancy.
12. **Wrap and Serve:**
– Fold the sides of the pita bread over the chicken and roll it up as a wrap. Secure with toothpicks if necessary. Serve immediately.
13. **Enjoy Middle Eastern Expertise:**
– Indulge in the Middle Eastern mastery of Chicken Shawarma, savoring the harmony of spices, tender chicken, and delightful combination of textures in every bite.
This chicken shawarma recipe brings the authentic flavors of the Middle East to your table, delivering a taste of mastery with each bite. Serve it as a wrap for a quick and satisfying meal.
Chicken Parmesan: Crispy and Cheesy Comfort
Contents:
– 4 boneless, skinless chicken breasts
– Salt and black pepper to taste
– 1 cupp all purpose flour
– 2 large eggs
– 2 cups breadcrumbs (Italian seasoned, if available)
– 1one cup grated parmesan cheese
– one cup marinara sauce
– only onecup shredded mozzarella cheese
– fresh basil or parsley, chopped (for garnish)
– Olive oil for frying
Instructions
1. Preheat Oven:
– Preheat your oven to 400°F (200°C).
2. Prepare the Chicken:
– Pat the chicken breasts dry with a paper towel. Season both sides with salt and black pepper.
3. Set up the braiding station:
– Set up a bread station with three shallow dishes. Fill one with all-purpose flour, one with beaten egg, and the third with a mixture of breadcrumbs and grated Parmesan cheese.
4. Coat chicken in flour:
– Coat each chicken breast in flour, shaking more.
5. Dip in beaten egg:
– Dip the battered chicken into the beaten egg, making sure it is completely coated.
6. Coat in breadcrumb mixture:
– Press the chicken into the breadcrumb and parmesan mixture, making sure it is evenly coated on all sides. Press the breadcrumbs over the chicken to adhere.
7. Fried Chicken:
– In a large skillet, heat the olive oil over medium-high heat. Fry the breaded chicken breasts until golden brown and crispy, about 3-4 minutes per side. Cook in batches if necessary. Place fried chicken on a paper towel-lined plate to absorb excess oil.
8. Assemble into baking dish:
– In a baking dish, spread a thin layer of marinara sauce. Place the fried chicken breasts on top of the sauce.
9. Top with Marinara and Cheese:
– Spoon more marinara sauce over each chicken breast, then sprinkle shredded mozzarella cheese on top.
10. Bake in the oven:
– Bake in the preheated oven for about 20-25 minutes or until the chicken is cooked through and the cheese is melted and bubbling.
11. Broil for a crispy finish (optional):
– For a more crispy and golden top, broil the chicken parmesan for 2-3 minutes, keeping a close eye to prevent burning.
12. Garnish with Fresh Herbs:
– Remove from oven and garnish with fresh chopped basil or parsley for flavor and freshness.
13. Serve warm:
– Serve Chicken Parmesan hot over cooked pasta or alongside your favorite vegetables.
14. Enjoy crispy and cheesy comfort:
– Indulge in the crispy and cheesy comfort of Chicken Parmesan, savoring the perfect combination of crispy breading, tender chicken, marinara and melted mozzarella.
This Chicken Parmesan recipe combines crispy-coated chicken with rich marinara sauce and gooey melted cheese for a comforting and satisfying meal. Perfect for a casual dinner with a touch of Italian flair.
**
**Thai Basil Chicken: A Symphony of Thai Flavors**
Contents:
– 1 pound ground chicken
– 2 tablespoons of vegetable oil
– 4 garlic cloves, minced
– 1-2 red chili peppers, thinly sliced
– 1 pepper, chopped
– 1 cup fresh Thai basil leaves
– 2 tablespoons of oyster sauce
– 1 tablespoon of soy sauce
– 1(one) tablespoon of fish sauce
– one teaspoon of sugar
– 1/4 cup chicken broth
– Cooked jasmine rice (for serving)
– Fried egg (optional, for topping)
Instructions
1. Prepare Materials:
– Finely chop the garlic, thinly slice the red pepper, and slice the pepper. Pick fresh Thai basil leaves from the stem.
2. Saute garlic and chili peppers:
– Heat vegetable oil in a wok or large skillet over medium-high heat. Add minced garlic and chopped red chili peppers. Cook for about 1-2 minutes until fragrant.
3. Add Ground Chicken:
– Add the ground chicken to the wok. Break it up with a spatula and cook until browned and fully cooked.
4. Add Vegetables:
– Add the chopped bell pepper and continue to stir for another 2-3 minutes until the bell pepper becomes slightly soft.
5. **Prepare the sauce:**
– Mix oyster sauce, soy sauce, fish sauce and sugar in a small bowl. Pour the sauce over the chicken and vegetables.
6. **Add Chicken Broth:
– Pour the chicken broth into the wok to create a saucy consistency. Mix everything together to make sure the sauce coats the chicken and vegetables evenly.
7. Include Thai Basil:
– Add fresh Thai basil leaves to the batter. Stir them until the basil wilts and returns its aromatic flavor to the dish.
8. Taste and Adjustment:
– Taste the Thai basil chicken and adjust the seasoning if necessary. You can add more soy sauce, fish sauce, or sugar according to your taste preferences.
9. Simmer (optional):
– Allow the Thai basil chicken to simmer for a few minutes, allowing the flavors to blend together. This step increases the depth of the dish.
10. Serve over rice:
– Plate Thai basil chicken over cooked jasmine rice. Fragrant jasmine rice complements the flavorful chicken.
11. Top with Fried Egg (Optional):
– For an extra touch of authenticity, top with Thai Basil Chicken Fried Egg. A runny yolk adds richness to a dish.
12. Garnish and enjoy:
– Garnish the Thai Basil Chicken with extra fresh basil leaves and chopped red chili peppers for a vibrant and inviting presentation. Enjoy a symphony of Thai flavors in every bite.
This Thai basil chicken meal recipe captures the essence of Thai cuisine, offering a harmonious blend of savory, spicy and aromatic flavors. A quick and delicious dish that is perfect for a weeknight meal with a taste of Thailand.
**
**Chicken Tacos with Avocado Lime Crema: Tex-Mex Fusion**
Contents:
For the chicken:
– 1 pound boneless, skinless chicken thighs, thinly sliced
– one tablespoon of olive oil
– onne teaspoon cumin seeds
– onlyone tsp chili powder
– 1(one) teaspoon of garlic powder
– Salt and black pepper to taste
– Flour or corn tortillas (for serving)
For the Avocado Lime Crema:
– 1 ripe avocado
– 1/2 cup of sour cream
– Juice of 1 lemon
– Salt to taste
For the toppings:
– Chopped lettuce
– Chopped tomatoes
– Sliced cheese
– Fresh cilantro, chopped
– Salsa or pico de gallo
Instructions
1. Prepare the Chicken Marinade:
– Mix olive oil, cumin, chili powder, garlic powder, salt and black pepper in a bowl. Mix well to make chicken marinade.
2. Marinate Chicken:
– Toss the thinly sliced chicken thighs in the marinade, making sure each piece is well coated. Let it marinate for at least 15-30 minutes.
3. Cook the Chicken:
– Heat a skillet over medium-high heat. Add the marinated chicken and cook until browned and cooked through, about 5-7 minutes.
4. Prepare Avocado Lime Creme:
– Blend ripe avocado, sour cream, lemon juice and a pinch of salt in a blender or food processor. Blend until smooth and creamy. Adjust the seasoning if necessary.
5. Warm Tortillas:
– Heat flour or corn tortillas in a dry skillet or microwave until warm. Cover them to retain heat.
6. Assemble the Tacos:
– Put out the hot tortillas. Spoon the cooked chicken into each tortilla.
7. Add Toppings:
– Top the chicken with shredded lettuce, diced tomatoes, shredded cheese, and fresh cilantro.
8. Drizzled with Avocado Lime Crema:
-Place the prepared avocado lime crema on top of the toppings. This creamy sauce adds a burst of flavor to tacos.
9. Serve with Salsa:
– Serve chicken tacos with avocado lime crema with your favorite salsa or pico de gallo.
10. Garnish and enjoy:
– Garnish tacos with additional cilantro or lime wedges, if desired. Enjoy a Tex-Mex fusion of flavors in every bite!
These Chicken Tacos meal with Avocado Lime Crema are a delicious blend of Tex-Mex flavors, combining tender spicy chicken with creamy avocado lime crema and vibrant toppings. Perfect for a quick and satisfying meal that brings the best of both worlds to your table.
Chicken meal Piccata: An Elegant and Tangy Delight
Contents:
– 4 boneless, skinless chicken breasts
– Salt and black pepper to taste
– 1/2 cup all-purpose flour, for dredging
– 4 tablespoons of unsalted butter
– 2 tablespoons of olive oil
– 1/3 cup fresh lemon juice (about 2 lemons)
– 1/2 cup chicken broth
– 1/4 cup capers, drained
– 1/4 cup fresh parsley, chopped (for garnish)
– Lemon wedge (for garnish)
– Cooked angel hair pasta or mashed potatoes (for serving)
Instructions
1. Prepare the chicken breast:
– Pat the chicken breasts dry with a paper towel. Season both sides with salt and black pepper.
2. Dredge in flour:
– Dredge each chicken meal breast in flour, shaking off more.
3. Saute the Chicken:
– In a large skillet, heat 2 tablespoons butter and olive oil over medium-high heat. Add the dredged chicken breasts and cook until golden brown on both sides, about 3-4 minutes per side. Remove chicken from skillet and set aside.
4. Make the Piccata Sauce:
– In the same skillet, add the lemon juice, chicken broth, and capers. Scrape any brown bits from the bottom of the pan for added flavor. Let it cook for a few minutes.
5. Add the chicken to the skillet:
– Return the cooked chicken meal breasts to the skillet, cook the chicken in the piccata sauce for an additional 5-7 minutes and simmer until the sauce thickens slightly.
6. finish with butter:
– Stir in the remaining 2 tablespoons of butter to finish the sauce. It adds richness and enhances the glossy texture.
7. Adjust Seasonings:
– Taste the sauce and season with salt and black pepper if necessary.
8. Garnish and serve:
– Garnish the chicken piccata with chopped fresh parsley and lemon slices for an elegant touch.
9. Serve over pasta or mashed potatoes:
– Plate the chicken piccata over cooked angel hair pasta or mashed potatoes. Spoon the tangy piccata sauce over each portion.
10. Enjoy elegant and tangy pleasure:
– Delight in the elegant and tangy flavors of Chicken Piccata, savoring the perfect balance of zesty lemon, savory capers, and tender chicken.
This chicken piccata recipe offers a sophisticated and flavorful dish that is surprisingly easy to prepare. Enhance your dinner with this fun and classic Italian-inspired delight.
Oven-Baked BBQ Chicken: Finger-Licking Goodness
Contents:
– 4-6 chicken leg quarters or a mixture of drumsticks and thighs
– Salt and black pepper to taste
– 1 tablespoo of olive oil
– 1 cup barbecue sauce
– 2 spoons of honey
– 1 table spoon Dijon mustard
– one ts of smoked paprika
– 1(one) spoon of garlic powder
– 1/2 teaspoon onion powder
– fresh cilantro or parsley, chopped (for garnish)
Instructions
1. Preheat the oven:
– Preheat your oven to 400°F (200°C).
2. Prepare the Chicken:
– Dry the chicken legs with a paper towel. Season generously with salt and black pepper.
3. Create the BBQ Sauce:
– In a bowl, combine barbecue sauce, honey, Dijon mustard, smoked paprika, garlic powder, and onion powder. This creates a flavorful barbecue sauce.
4. **Chicken Coat:**
– Brush each chicken leg with olive oil, making sure they are well coated. This helps to crisp the skin in the oven. Place chicken in baking dish.
5. **Apply BBQ Sauce:**
– Generously brush each piece of chicken with the prepared barbecue sauce, coating both sides. Reserve some sauce for basting during baking.
6. **Bake in the oven:**
– Bake chicken in preheated oven for 40-45 minutes or until internal temperature reaches 165°F (74°C). Baste the chicken with additional barbecue sauce halfway through the cooking time.
7. **Broil for crispy skin (optional):**
– If you prefer extra crispy skin, broil the chicken for 2-3 minutes after baking, keeping a close eye to prevent burning.
8. **Check for donation:**
– Make sure the chicken is cooked, and the juices run clear. The skin should be crispy and golden.
9. **Garnish with Fresh Herbs:**
– Sprinkle chopped fresh cilantro or parsley over oven-baked BBQ chicken for a touch of freshness.
10. **Serve hot:**
– Plate the chicken and serve hot. Pair it with your favorite sides, like coleslaw, baked beans, or cornbread.
11. **Enjoy finger licking goodness:**
– Indulge in the finger-licking goodness of oven-baked BBQ chicken, savoring the perfect combination of smoky barbecue flavor and juicy, tender chicken meal meat.
This oven-baked BBQ chicken recipe offers a great barbecue experience without the need for a grill. Easy to make and incredibly delicious, it’s a crowd-pleaser for any occasion.
Chicken meal Caesar Salad: Freshness in Every Bite**
Contents:
For the grilled chicken:
– 2 boneless, skinless chicken breasts
– 2 tablespoons of olive oil
– one teaspoon of garlic powder
– 1 ts of dried oregano
– Salt and black pepper to taste
– Juice of 1 lemon
For Caesar Dressing:
– 1/2 cup mayonnaise
– 1/4 cup grated parmesan cheese
– twoo spoon Dijon mustard
– 2 garlic cloves, minced
– two ts anchovy paste (optional)
– 1 tablespoons Worcestershire sauce
– Juice of 1 lemon
– Salt and black pepper to taste
For the salad:
– Romaine lettuce, washed and torn into bite-sized pieces
– Croutons
– Grated Parmesan cheese
– Cherry tomatoes, half
instructions:
**Grill the Chicken:**
1. **Preheat grill or pan:**
– Preheat an outdoor grill or grill pan to medium-high heat.
2. **Season Chicken:**
– Brush chicken breasts with olive oil and season with garlic powder, dried oregano, salt and black pepper. Squeeze lemon juice over chicken.
3. **Grilled Chicken:**
– Grill chicken for about 6-8 minutes per side or until internal temperature reaches 165°F (74°C). Make sure to get good grill marks for added flavor.
4. **Rest and Slice:**
– Let the grilled chicken rest for a few minutes, then cut it into thin strips.
**Prepare Caesar Dressing:**
5. **Mix Dressing Ingredients:**
– In a bowl, whisk together the mayonnaise, grated Parmesan cheese, Dijon mustard, minced garlic, anchovy paste (if using), Worcestershire sauce, lemon juice, salt and pepper. Adjust the spices according to taste.
** Assemble the Chicken Caesar Salad: **
6. **Toss Salad:**
– In a large bowl, toss torn romaine lettuce with Caesar dressing until evenly coated.
7. Add Grilled Chicken:
– Arrange the sliced grilled chicken on top of the dressed salad.
8. Crouton and Parmesan Sprinkle:
– Sprinkle croutons and grated parmesan cheese over the salad for crunch and extra flavor.
9. Add cherry tomatoes:
– Scatter halved cherry tomatoes over the salad for freshness and a burst of color.
10. Serve immediately:
-Chicken Caesar Salad Gently toss to combine all ingredients. Serve immediately.
11. Enjoy freshness in every bite:
– Indulge in the freshness of Chicken Caesar Salad, savoring the crisp lettuce, flavorful grilled chicken, and creamy, tangy Caesar dressing in every delicious bite.
This chicken Caesar salad recipe brings together classic ingredients to create a refreshing and satisfying dish. Perfect for a light lunch or dinner, this salad offers a balance of textures and flavors that will leave you wanting more.
**
Honey Mustard Glazed Chicken: Sweet and Tangy Elegance
Contents:
For the Honey Mustard Glaze:
1/4 cup Dijon mustard
2 spoon of honey
2 tspoons whole-grain mustard
2tablespoons of soy sauce
2garlic cloves, minced
1 tsp dried thyme (optional)
Salt and black pepper to taste
For the chicken:
4 boneless, skinless chicken breasts
Salt and black pepper to taste
1 tablespoon of olive oil
fresh parsley, chopped (for garnish) visit https://www.delish.com/
Instructions
Prepare the Honey Mustard Glaze:
Mixed Glaze Ingredients:
- In a bowl, whisk together Dijon mustard, honey, whole-grain mustard, soy sauce, minced garlic, dried thyme (if using), salt, and black pepper. This creates a sweet and tangy honey mustard glaze.
Cook the Chicken:
Season Chicken:
- Season chicken breast with salt and black pepper.
Sear Chicken:
- In an oven-safe skillet, heat the olive oil over medium-high heat. Sear the chicken breasts for 2-3 minutes per side until golden brown.
Brush with glaze:
- Brush the chicken breasts generously with the prepared honey mustard glaze, making sure they are well coated.
Bake in the oven:
- Transfer the skillet to the preheated oven. Bake for 20-25 minutes or until the internal temperature of the chicken reaches 165°F (74°C), and the glaze has caramelized.
Baste while cooking:
- Baste the chicken with additional honey mustard glaze halfway through the baking time to enhance the flavor and create a beautiful glaze.
Check for donation:
- Make sure the chicken is fully cooked, and the juices run clear.in chicken meal The glaze should be sticky and golden.
Toppings and Garnishes:
- Let the Honey Mustard Glazed Chicken rest for a few minutes before slicing. Garnish with chopped fresh parsley for a burst of color and freshness.
Serve and Enjoy:
- Plate the glazed chicken breasts and serve them hot. Spoon any leftover glaze from the skillet over the chicken for extra flavor.
Taste Sweet and Tangy Elegance:
Enjoy the sweet and tangy elegance of Honey Mustard Glazed Chicken, the perfect balance of flavors and caramelized glaze.
This Honey Mustard Glazed Chicken recipe combines simple ingredients to create a dish that is both elegant and bursting with flavor. , making it a great choice for a special chicken meal visit interactivegoal.com for more blogs
Creamy Chicken and Mushroom Risotto: Comforting Italian Elegance
Contents:
- 1 cup arborio rice
- 1/2 cup dry white wine
- 4 cups chicken broth, kept warm
- 1 cup cooked chicken, shredded or shredded
- 1 cup mushrooms, chopped
- 1 small onion, finely chopped
- two garlic cloves, minced
- 1/2 cup Parmesan cheese, grated
- 1/4 cup heavy cream
- 2 tablespoons of butter
- 2 tablespoons of olive oil
- Salt and black pepper to taste
- fresh parsley, chopped (for garnish)